Azure Environment Initialization
This guide covers everything you need to initialize a Fractal Cloud environment on Microsoft Azure.
Prerequisites
We recommend that an administrator performs environment initialization, as the Azure principal will need privileged access.
An administrator may assign the Contributor and Role Based Access Control Administrator roles to allow a group of principals to perform environment initialization independently. See Managing service principal roles for details.
Initialize via Web UI
Ensure you have assigned the roles Contributor and Role Based Access Control Administrator on the subscription you want to initialize.
Troubleshooting: KeyVault registration
If you receive this error regarding KeyVault:
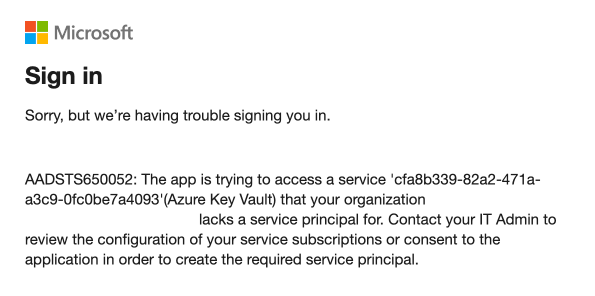
You need to register the Microsoft.KeyVault resource provider. Choose one of these methods:
Azure Portal:
- Go to the Azure Portal, navigate to Subscriptions and select your subscription.
- In the left-hand menu under Settings, select Resource providers.
- In the "Filter by name" box, type
Microsoft.KeyVault. - Click the "..." button on the
Microsoft.KeyVaultrow and select Register.
Azure CLI:
az provider register -n "Microsoft.KeyVault"
The registration status will take a few seconds to update.
Once configured, follow the general Web UI steps to complete the initialization.
Initialize via SDK
Step 1: Create a Service Principal
Create a Service Principal and assign the required roles on each subscription where the Cloud Agent needs access:
# Create the service principal
az ad sp create-for-rbac --name "Fractal Cloud Initializer"

# Grant required roles on the target subscription
az role assignment create \
  --assignee <SERVICE_PRINCIPAL_ID> \
  --role "Contributor" \
  --scope /subscriptions/<SUBSCRIPTION_ID>

az role assignment create \
  --assignee <SERVICE_PRINCIPAL_ID> \
  --role "Role Based Access Control Administrator" \
  --scope /subscriptions/<SUBSCRIPTION_ID>
Step 2: Verify role assignments
az ad app permission list --id <SERVICE_PRINCIPAL_ID>
You should see both Contributor and Role Based Access Control Administrator scoped to your subscription.
Step 3: Run the initialization
Follow the environment initialization sample to initialize the environment programmatically.
Do not manually modify any resources within the rg-fractal Resource Group.
Initialize with OIDC (Workload Identity Federation)
The service-principal flow above authenticates the Cloud Agent with a client secret. When you run the SDK from a CI/CD pipeline that already issues OIDC tokens — such as GitHub Actions or GitLab CI/CD — you can initialize the agent without any long-lived secret by using Azure Workload Identity Federation.
The pipeline mints a short-lived OIDC token, and the SDK forwards it to Fractal Cloud as the client assertion. Azure trusts it because you registered a federated credential on the app registration that maps your pipeline's issuer and subject to the app. No secret ever leaves the runner.
OIDC-based initialization is currently supported for Azure. AWS and GCP continue to use their static credential flows.
Step 1 — Register the federated credential
Create (or reuse) an app registration for the Cloud Agent and add a federated
credential that trusts your pipeline. The subject must match the token your
CI system issues (the example below trusts the main branch of a GitHub repo):
az ad app federated-credential create \
  --id <APP_REGISTRATION_CLIENT_ID> \
  --parameters '{
    "name": "fractal-cloud-github-main",
    "issuer": "https://token.actions.githubusercontent.com",
    "subject": "repo:<ORG>/<REPO>:ref:refs/heads/main",
    "audiences": ["api://AzureADTokenExchange"]
  }'
Assign the same Contributor and Role Based Access Control Administrator roles to this app registration as in the service-principal flow above.
For GitLab, set issuer to your instance's OIDC issuer (e.g.
https://gitlab.com) and subject to the matching sub claim of the GitLab
ID token (e.g. project_path:<group>/<project>:ref_type:branch:ref:main).
Step 2 — Mint the token and initialize
In sp mode you pass the client id and secret; in oidc mode you pass the
(public) client id and a freshly-minted federated token. The SDK forwards the
token as the Azure client assertion — nothing else changes.
// GitHub Actions exposes an OIDC token endpoint when the job has
// `permissions: id-token: write`. Request a token whose audience is Azure AD's
// token exchange, then hand it to the SDK as the federated token.
async function fetchAzureFederatedToken(): Promise<string> {
  const url = process.env.ACTIONS_ID_TOKEN_REQUEST_URL!;
  const requestToken = process.env.ACTIONS_ID_TOKEN_REQUEST_TOKEN!;
  const audience = 'api://AzureADTokenExchange';
  const res = await fetch(`${url}&audience=${encodeURIComponent(audience)}`, {
    headers: {Authorization: `Bearer ${requestToken}`},
  });
  const body = (await res.json()) as {value: string};
  return body.value;
}

const federatedToken = await fetchAzureFederatedToken();

await deployEnvironment(management, credentials, {
  agentInit: 'wait',
  providerCredentials: {
    // OIDC (secretless): public client id + short-lived federated token.
    azure: {clientId: process.env.AZURE_SP_CLIENT_ID!, federatedToken},
    // Service-principal (default): client id + secret.
    // azure: {spClientId: '...', spClientSecret: '...'},
  },
});
In your GitHub Actions workflow, grant the job the id-token permission:
permissions:
  id-token: write   # required to mint the OIDC token
  contents: read
The TypeScript SDK
samples basic_environment
sample runs in both modes — set AZURE_CLOUD_AGENT_AUTH=oidc to select the
federated flow (default is sp).
Optional: MS Graph permissions for App Role assignments
You only need this section if your components use RoleType.APP_ROLE_ASSIGNMENT or any CustomWorkloadRole that requires assigning MS Graph App Roles.
If your components use only Azure built-in roles or standard Azure RBAC roles, skip this section entirely.
Some components, such as AzureWebApp, allow you to add roles using the SDK:
withRole(CustomWorkloadRole role)
withRoles(List<CustomWorkloadRole> roles)
When using RoleType.APP_ROLE_ASSIGNMENT, Azure Active Directory App Role assignment capabilities are required. These permissions are not assigned automatically during initialization. You must configure them manually.
Required permissions
Grant the following Microsoft Graph Application permissions to the Cloud Agent's managed identity (id-fractal-cloud-agent):
| Permission Name | Permission ID | Purpose |
|---|---|---|
AppRoleAssignment.ReadWrite.All | 9a5d68dd-52b0-4cc2-bd40-abcf44ac3a30 | Assign and remove App Roles |
Directory.ReadWrite.All | 06b708a9-e830-4db3-a914-8e69da51d44f | Modify directory objects for role assignments |
Add the permissions
Replace <MANAGED_IDENTITY_OBJECT_ID> with the object ID of the id-fractal-cloud-agent identity:
az ad app permission add \
  --id <MANAGED_IDENTITY_OBJECT_ID> \
  --api 00000003-0000-0000-c000-000000000000 \
  --api-permissions 9a5d68dd-52b0-4cc2-bd40-abcf44ac3a30=Role

az ad app permission add \
  --id <MANAGED_IDENTITY_OBJECT_ID> \
  --api 00000003-0000-0000-c000-000000000000 \
  --api-permissions 06b708a9-e830-4db3-a914-8e69da51d44f=Role
Grant admin consent
A Global Administrator or Privileged Role Administrator must approve these permissions. Follow Microsoft's guidance on granting admin consent.
Verify
az ad app permission list --id <MANAGED_IDENTITY_OBJECT_ID>
You should see AppRoleAssignment.ReadWrite.All and Directory.ReadWrite.All listed.
| Use Case | Requires manual MS Graph setup? |
|---|---|
| Standard Azure environment initialization | No |
| Components using Azure built-in RBAC roles | No |
| Components using custom Azure RBAC roles | No |
Components using RoleType.APP_ROLE_ASSIGNMENT | Yes |